


Running Ubuntu 16.04 LTS and want to upgrade to the latest GNOME 3.20 release?
Well, you can, and in this post we’ll show you how.
Released on March 23, GNOME 3.20 brings a number of welcome improvements to the GNOME experience, updates a raft of core apps and adds more polish to the GNOME Shell, er, shell.
To install GNOME 3.20 on Ubuntu 16.04 you will need a couple of things, the most important of which is some semblance of competence.
Why?
What follows is not an officially supported upgrade path. You will upgrade to GNOME 3.20 at your own risk. If adding the following PPAs breaks your system you get to keep all the pieces!
Things to be aware of
Some Ubuntu-patched apps, e.g., Nautilus, get switched to their stock GNOME equivalent as part of this upgrade. While this doesn’t impact on the GNOME experience, if you intend to switch between Unity and GNOME you should expect some compromise on the Unity half.
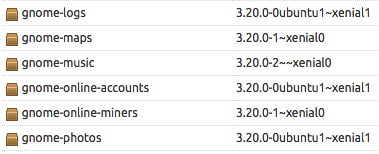
Lastly, be aware that several updated GNOME apps are missing from this PPA at present. You won’t get the latest versions of Evince, Web (aka ‘Epiphany browser’), or Vinagre. See the list of published packages in this PPA for more details on what is or isn’t included
Obviously things are going to go smoother if you already use Ubuntu GNOME 16.04.
That said if you are using standard Ubuntu (with the Unity desktop) you can still install GNOME 3.20 following this guide. All the necessary stack will be pulled in automatically. It simply saves time to have the bulk of it already there.
Install GNOME 3.20 on Ubuntu 16.04 LTS
To get your GNOME 3.20 upgrade started you need to add the GNOME 3 Testing PPA to Ubuntu Software Sources.
This PPA houses packages for testing before they’re copied over the main GNOME 3 “Stable” PPA.
Or so used to be the case. We hear the staging PPA will be declared the new ‘stable’ PPA shortly.
Either way, since you’re willing to upgrade to potential unstable packages, you can go ahead.
We’ll use the Terminal to add the two GNOME 3 PPAs:
sudo add-apt-repository ppa:gnome3-team/gnome3-staging

sudo add-apt-repository ppa:gnome3-team/gnome3
Next, refresh your software sources:
sudo apt update
Finally upgrade (if you already have GNOME-Shell installed) using:
sudo apt dist-upgrade
Or install GNOME (if you don’t already use it):
sudo apt install gnome gnome-shell
As part of the install/upgrade process you’ll be asked to pick which Display Manager (aka login screen) you wish to use.
If you’re going GNOME-only then GDM is fine. But if you plan to switch between GNOME and other DEs I recommend sticking with LightDM (various reasons; the tl;dr is that it ‘just works’ better).
Finally, after everything had been downloaded, unpacked and install you should reboot your system to make sure all the heavy pieces clink neatly into place.
When your system comes back up remember to select the GNOME session from the login screen and login as usual.
Now you can play a game of ‘spot what’s broken’. Share your findings/experience in the space below.