Much to some readers annoyance I have to compress and resize almost every image that appears on this blog. If I didn’t …Well, you can imagine what loading a page full of 2.3MB PNG Budgie desktop screenshots would be like!
There are a multitude of ways you can reduce jpg and png image file size on Ubuntu. You can use proper image editing software like GIMP or a photo manager like Shotwell, or turn to the command line to do batch processing of multiple files to a given criteria.
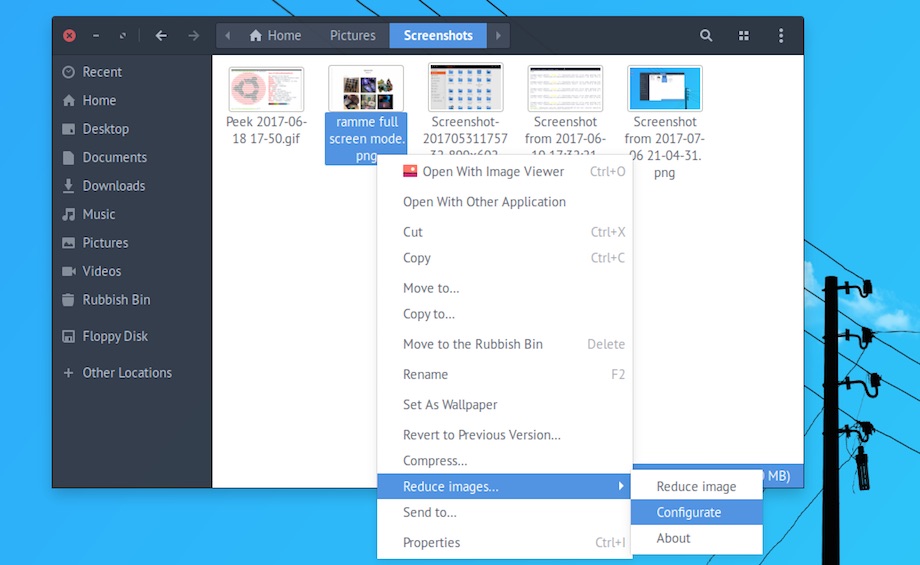
Another way, and one I’m highlighting today, is using a Nautilus script. This is one of my go-to methods to resize full-size screenshots. With a simple right-click on any jpg or png I resize them to a given width and export them to a format that delivers best quality:size — and then upload ’em here.
This Nautilus script is the work of Spanish Linux team Atareao (perhaps most famous for stat-packed weather indicator). It’s called ‘reduceimages’ and it can:
- Reduce images (constrained), with border added if needed
- Opt to add a border to all images
- Choose background color (i.e. useful if image is transparent PNG)
- Reduce JPEG quality
- Convert PNG to JPG
- Overwrite existing image
If you fancy taking it for a spin to see if it can slot in to your workflow, you can.
Pop open a Terminal window and run the command below to add the Atareao PPA to your Software Sources. This PPA provides packages for Ubuntu 16.04 LTS and above:
sudo add-apt-repository ppa:atareao/nautilus-extensions
Next update your list of packages and install the ‘nautilus-reduceimages’ script:
sudo apt update && sudo apt install nautilus-reduceimages
Finally, restart Nautilus using nautilus -q so that the script you just installed will be available in the right-click menu of Nautilus when you right-click on a compatible image file (either a jpg or a png).
This menu lets you select one of two options:
- Reduce file size
- Configurator
Although translated oddly it is the second option you’ll want to use first. This lets you configure exactly how images are reduced and resized:

You can always tweak these settings before running the script, otherwise it simply processes images using whatever settings you entered last.
While this script is useful (to me at least!) it has a few drawbacks. The biggest is that it keeps images constrained when resizing, adding a border/background as an offset.
So, if you try to resize a 1440×900 screenshot to, I don’t know, 720×50 using this script it will do this:

Instead of this:

Which, depending on what you need, might be of benefit or bane.
For more precise image resizing and quality reduction you will still need to use something more advanced than a simple script.
But for rough and ready file reductions and resizing, perfect for sharing on social media and on blogs, this Nautilus script gives you a fast and fuss-free solution.
Let us know your thoughts!