 Ubuntu 16.04 is nearing release, meaning some of you will soon be thinking about when and how you plan to upgrade.
You don’t have to start from scratch with a fresh install (though some swear by it). You can upgrade to Ubuntu 16.04 ‘Xenial Xerus’ from Ubuntu 15.10, both before its final release and after.
In this article shows you how.
Things You’ll Need to Upgrade
To follow along with this tutorial you need the following 3 things:
- An (up-to-date) install of Ubuntu 15.10
- A (working) internet connection
- A smidgen of patience
That it; you don’t need a USB thumb-drive, blank DVD, or even a cup of coffee (though the latter is still very much recommended).
Provisos

Just because you can upgrade to Ubuntu 16.04 LTS early doesn’t mean you should. You’ll be migrating from a supported stable version of Ubuntu to a pre-release version.
You should expect to encounter bugs (and possibly performance issues, doubly-true if your device uses AMD graphics).
It’s rare for in-place upgrades to go (drastically) wrong but it’s not impossible. Be smart and make a back-up of any/all important files BEFORE you begin.
Any third-party PPAs you currently have enabled will be disabled as part of the upgrade process.
If you’re upgrading a virtual machine now is an ideal time to use the snapshot feature (if available in your client) and make a mental note to re-install any ‘extras’ packages required for working 3D, file-sharing, etc.
Caution out of the way one final thing to note (because people always ask): as long as you install all updates as they’re pushed out to you, you will be running the exact same desktop as will be released later this month. You won’t need to ‘upgrade’ again.
On we go.
Prepare Your System
- Open “Software & Updates” in System Settings.
- Select the “Updates” tab in the window that appears
- Under “Install Updates from” click the box next to “Pre-released updates“
- Set “Notify me of a new Ubuntu version” to “For any new version”
With the prep out of the way we can move on to the upgrade itself. This will differ depending on whether you’re reading this before or after the official release.
Upgrade Before Ubuntu 16.04 LTS Is Released
If you read this post before April 21, 2016 you will need to use the do-upgrade option.
Once again, keep in mind that you are upgrading from a stable Ubuntu release to a development one and this has possible drawbacks (especially if you use AMD graphics).
sudo apt-get update && sudo apt-get dist-upgrade
sudo update-manager -d
This last command will open the Update Manager tool where you’ll be able to press a shiny ‘upgrade’ button.
Upgrade After Ubuntu 16.04 LTS Is Released
If you read this article on or after April 21, 2016 upgrading from Ubuntu 15.10 is a cinch:
- Open “Update Manager” from the Unity Dash
- Let it check for new updates
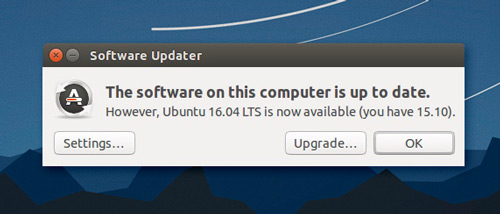
- You’ll see the prompt: “New distribution release ‘16.04 LTS’ is available“.
- Click Upgrade and follow any on-screen instructions
If you don’t see this prompt you can try and force the upgrade from the command line. Run:
sudo do-release-upgrade
Okay the upgrade by entering your user password and pressing ‘y’ when prompted.
And that’s it; let the install process fetch all the required updates (this can take a while). When done, reboot your system.