Ubuntu 10.10 will see the much-derided F-Spot pushed out of the frame in favour of the lighter, leaner Yorba-developed photo manager/editor app going by the name of ‘Shotwell‘.
Whilst we’ve featured Shotwell many times on OMG! Ubuntu! but, for many of you reading this, Maverick will be your first chance to get a close-up with the neat little tool.
With that in mind what better time for a brief run down of using Shotwell. We likely won’t squeeze in a mention for every options, setting and feature Shotwell has but we’ll do our best…
First run
You’re new to Shotwell and Shotwell knows that. To help develop your potential relationship Shotwell launches a handy ‘first-run’ dialogue to get you up and running. ![Selection_004[3]](http://lh5.ggpht.com/_FJH0hYZmVtc/TGFmpYreLFI/AAAAAAAAJQY/AbwTxsqfRDE/s1600-h/Selection_0043%5B1%5D.png "Selection_004[3]")
Photos can be imported via the ‘File’ menu, a camera or simply dragging and dropping images on to the Shotwell interface.
Importing photos from a camera
Shotwell, like F-Spot, can be made to auto-launch on the insertion of a digital camera. ![4.0 GB Filesystem_006[3]](http://lh3.ggpht.com/_FJH0hYZmVtc/TFvy0z0gwkI/AAAAAAAAJKM/fM-FPPXy7UU/s1600-h/4.0%20GB%20Filesystem_006%5B3%5D%5B3%5D.png "4.0 GB Filesystem_006[3]") I plugged in my Kodak Zi8 – a HD video camera that can also take photos – to see what would happen.
I plugged in my Kodak Zi8 – a HD video camera that can also take photos – to see what would happen.
The process was instant: I plugged in, the dialogue above opened, I clicked okay and there were my photos in Shotwell ready to be imported, edited and tagged. ![Shotwell_008[3]](http://lh5.ggpht.com/_FJH0hYZmVtc/TFvy4NBBsdI/AAAAAAAAJKU/P2_1xuS8qwA/s1600-h/Shotwell_008%5B3%5D%5B3%5D.png "Shotwell_008[3]")
I didn’t want to import my entire collection of random photos to my Pictures folder (Shotwells default placing) but merely a couple.
Selecting a number other than ‘all’ would be a bit unintuitive for someone not versed in the handy CTRL+Click. I initially thought I could simply click on the ones I wished to import to select them, clicking them again to deselect, but no dice.
After selecting my photos for import using CTRL+Click I then used the right click menu to import them.![Shotwell_009[3]](http://lh6.ggpht.com/_FJH0hYZmVtc/TFvy7t1QF2I/AAAAAAAAJKc/0ABUmfa13yk/s1600-h/Shotwell_009%5B3%5D%5B3%5D.png "Shotwell_009[3]")
Yikes! After a successful import the following prompt popped up which, had I not paid attention, could easily have cost me my original photos! ![Import Complete_010[3]](http://lh3.ggpht.com/_FJH0hYZmVtc/TFvy9nHdm4I/AAAAAAAAJKk/ih7yipAdUCg/s1600-h/Import%20Complete_010%5B3%5D%5B3%5D.png "Import Complete_010[3]")
The Main window
One great thing about Shotwell is the consistency – you don’t have separate jarring designed windows for import, editing, etc – they all not only look pretty much the same but behave the same.
The main window can be zoomed into, you can right click on photos to duplicate photos and add tags.
Photos are grouped into ‘events’ based on the the date/time the photos was taken. These dates can be renamed to more meaningful titles such as ‘Day out with Benjamin’ or ‘UDS 2009′. Where there is no date available the event defaults to the date the photo was imported. ![Shotwell_011[3]](http://lh3.ggpht.com/_FJH0hYZmVtc/TFvy-0aIA1I/AAAAAAAAJKs/A7ttxX8jJOw/s1600-h/Shotwell_011%5B3%5D%5B3%5D.png "Shotwell_011[3]")
Tagging and Events
Adding tags makes sorting photos, at least in my opinion, easier. Want to find all photos with Aunt Thelma in? Tags all the pictures she’s in with ‘Thelma’ and hey presto – easy access.
Adding tags is done by selecting/right-clicking on the photo/s you wish to add a certain tag/s to and choosing ‘add tag’.![Add Tags_015[3]](http://lh6.ggpht.com/_FJH0hYZmVtc/TFvzAREhp6I/AAAAAAAAJK0/rF7hMiP_MyQ/s1600-h/Add%20Tags_015%5B3%5D%5B3%5D.png "Add Tags_015[3]") Adjust time and date
Adjust time and date
We touched on ‘event’ data above but often this might not be accurate or your desired preference. You can adjust the time and date data of selected photos by right clicking on the photo(s) you wish to edit and choosing ‘Adjust time and date’. ![Adjust Date and Time_016[3]](http://lh3.ggpht.com/_FJH0hYZmVtc/TFvzDN6TStI/AAAAAAAAJK8/fBQ7L4T7Hhk/s1600-h/Adjust%20Date%20and%20Time_016%5B3%5D%5B3%5D.png "Adjust Date and Time_016[3]")
Editing
Shotwell comes packed with an impressive – nay comprehensive – array of editing and tweaking tools, helping touch up photos that are overly dark, washed out, need red eyes removed, etc. ![Shotwell_014[3]](http://lh3.ggpht.com/_FJH0hYZmVtc/TFvzH1vwF2I/AAAAAAAAJLE/ZOVpU87i45E/s1600-h/Shotwell_014%5B3%5D%5B3%5D.png "Shotwell_014[3]")
To edit a photo you simply need to double click on it. It will open up larger with the editing toolbar underneath. The main ‘editing’ tools present in Shotwell are: –
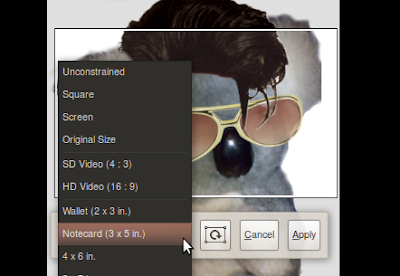
- Rotation
- Cropping (with auto-sizes etc)
- Red eye reduction
- Adjust exposure, saturation, tint, temperature and shadow
- Cne-click “enhance” feature
 Other features available, but only present in the ‘photo’ menu include mirroring, flipping and
One click enhance
The one-click ‘enhance’ feature is pretty hit and miss. Below sit two photos. The left is the original and the right has been “enhanced” using the one-click tool in shotwell.
Whilst the image does look better on the whole it is a bit overly light in places (for example the top of my thigh) but the best contrast is pretty decent for an ‘automatic’ method – but certainly not up to par with Google Picasa.


One doesn’t need to be in editor mode to apply the auto-enhance effect – just right-click on any photo & select ‘enhance’.
Slideshow
Shotwell boats a slideshow feature that is no worse �” or no better �” than that of any other image viewer or organizer. You can specify time between transition and manually hit the “next/previous” buttons to zip though.
Exporting photos
No desktop photo manager would be worth saying Cheese to if it lacked social-media exporting. Fans of F-Spot willing to give Shotwell a try will find that it also supports major online services such as: –
- Flickr
- PicasaWeb
Preferences
Everyone loves a good preferences package and Shotwell has… well.. a few preferences. To be fair up until recently Shotwell had no preferences at all so this is a step in the right direction.  Here you can set the background colour (on a scale of white to dark), import location (defaults to the Pictures folder in your Home) and set external applications for advanced editing.
![]()