This is the third article in a series to explain the basics of Ubuntu Development in a way that does not require huge amounts of background and goes through concepts, tools, processes and infrastructure step by step. If you like the article or have questions or found bugs, please leave a comment.
Thanks a lot to the Ubuntu Packaging Guide team for their work on this!
Fixing a bug in Ubuntu
Introduction
If you followed the instructions to get set up with Ubuntu Development, you should be all set and ready to go.
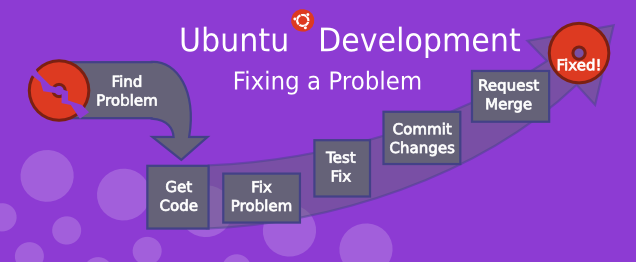
As you can see in the image above, there is no surprises in the process of fixing bugs in Ubuntu: you found a problem, you get the code, work on the fix, test it, push your changes to Launchpad and ask for it to be reviewed and merged. In this guide we will go through all the necessary steps one by one.
Finding the problem
There are a lot of different ways to find things to work on. It might be a bug report you are encountering yourself (which gives you a good opportunity to test the fix), or a problem you noted elsewhere, maybe in a bug report.
Harvest is where we keep track of various TODO lists regarding Ubuntu development. It lists bugs that were fixed upstream or in Debian already, lists small bugs (we call them ‘bitesize’), and so on. Check it out and find your first bug to work on.
Figuring out what to fix
If you don’t know the source package containing the code that has the problem, but you do know the path to the affected program on your system, you can discover the source package that you’ll need to work on.
Let’s say you’ve found a bug in Tomboy, a note taking desktop application. The Tomboy application can be started by running /usr/bin/tomboy on the command line. To find the binary package containing this application, use this command:
$ apt-file find /usr/bin/tomboy
This would print out:
tomboy: /usr/bin/tomboy
Note that the part preceding the colon is the binary package name. It’s often the case that the source package and binary package will have different names. This is most common when a single source package is used to build multiple different binary packages. To find the source package for a particular binary package, type:
$ apt-cache showsrc tomboy | grep ^Package:
Package: tomboy
$ apt-cache showsrc python-vigra | grep ^Package:
Package: libvigraimpex
Getting the code
Once you know the source package to work on, you will want to get a copy of the code on your system, so that you can debug it. In Ubuntu Distributed Development this is done by branching the source package branch corresponding to the source package. Launchpad maintains source package branches for all the packages in Ubuntu.
Once you’ve got a local branch of the source package, you can investigate the bug, create a fix, and upload your proposed fix to Launchpad, in the form of a Bazaar branch. When you are happy with your fix, you can submit a merge proposal, which asks other Ubuntu developers to review and approve your change. If they agree with your changes, an Ubuntu developer will upload the new version of the package to Ubuntu so that everyone gets the benefit of your excellent fix – and you get a little bit of credit. You’re now on your way to becoming an Ubuntu developer!
We’ll describe specifics on how to branch the code, push your fix, and request a review in the following sections.
Work on a fix
There are entire books written about finding bugs, fixing them, testing them, etc. If you are completely new to programming, try to fix easy bugs such as obvious typos first. Try to keep changes as minimal as possible and document your change and assumptions clearly.
Before working on a fix yourself, make sure to investigate if nobody else has fixed it already or is currently working on a fix. Good sources to check are:
- Upstream (and Debian) bug tracker (open and closed bugs),
- Upstream revision history (or newer release) might have fixed the problem,
- bugs or package uploads of Debian or other distributions.
You now want to create a patch which includes the fix. The command edit-patch is a simple way to add a patch to a package. Run:
$ edit-patch 99-new-patch
This will copy the packaging to a temporary directory. You can now edit files with a text editor or apply patches from upstream, for example:
$ patch -p1 < ../bugfix.patch
After editing the file type exit or press control-d to quit the temporary shell. The new patch will have been added into debian/patches.
Testing the fix
To build a test package with your changes, run these commands:
$ bzr bd -- -S -us -uc
$ pbuilder-dist <release> build ../<package>_<version>.dsc
This will create a source package from the branch contents (-us -uc will just omit the step to sign the source package) and pbuilder-dist will build the package from source for whatever release you choose.
Once the build succeeds, install the package from ~/pbuilder/<release>_result/ (using sudo dpkg -i <package>_<version>.deb). Then test to see if the bug is fixed.
Documenting the fix
It is very important to document your change sufficiently so developers who look at the code in the future won’t have to guess what your reasoning was and what your assumptions were. Every Debian and Ubuntu package source includes debian/changelog, where changes of each uploaded package are tracked.
The easiest way to update this is to run:
$ dch -i
This will add a boilerplate changelog entry for you and launch an editor where you can fill in the blanks. An example of this could be:
specialpackage (1.2-3ubuntu4) natty; urgency=low

  * debian/control: updated description to include frobnicator (LP: #123456)

 -- Emma Adams <emma.adams@isp.com>  Sat, 17 Jul 2010 02:53:39 +0200
dch should fill out the first and last line of such a changelog entry for you already. Line 1 consists of the source package name, the version number, which Ubuntu release it is uploaded to, the urgency (which almost always is ‘low’). The last line always contains the name, email address and timestamp (in RFC 5322 format) of the change.
With that out of the way, let’s focus on the actual changelog entry itself: it is very important to document:
- where the change was done
- what was changed
- where the discussion of the change happened
In our (very sparse) example the last point is covered by (LP: #123456) which refers to Launchpad bug 123456. Bug reports or mailing list threads or specifications are usually good information to provide as a rationale for a change. As a bonus, if you use the LP: #<number> notation for Launchpad bugs, the bug will be automatically closed when the package is uploaded to Ubuntu.
Committing the fix
With the changelog entry written and saved, you can just run:
bzr commit
and the change will be committed (locally) with your changelog entry as a commit message.
To push it to Launchpad, as the remote branch name, you need to stick to the following nomenclature:
lp:~<yourlpid>/ubuntu/<release>/<package>/<branchname>
This could for example be:
lp:~emmaadams/ubuntu/natty/specialpackage/fix-for-123456
So if you just run:
bzr push lp:~emmaadams/ubuntu/natty/specialpackage/fix-for-123456
bzr lp-open
you should be all set. The push command should push it to Launchpad and the second command will open the Launchpad page of the remote branch in your browser. There find the “(+) Propose for merging” link, click it to get the change reviewed by somebody and included in Ubuntu.