A fresh install of Ubuntu is great, but there are still a few bits missing such as MP3 playback, expanded software sources, and your own set of preferred programmes.
Thankfully, all of these are a click or two away. Here’s my list of things to do after installing Ubuntu 9.04 (Including extra tips if you’re using a 64-bit version of Ubuntu)
Enable ‘Multiverse Repositories’ & Install Codecs, Flash, Java, Etc
The default repositories in Ubuntu provide a limited set of applications. Enabling Multiverse Repositories gives you wider access to third-party apps you’ll love.
The snappily titled ‘ubuntu-restricted-extras’ package provides all the codecs and media support you’ll likely need, including Flash for watching YouTube videos etc.
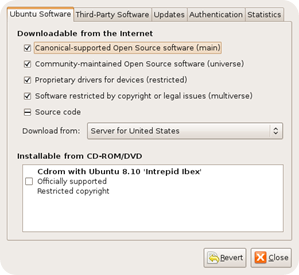
To install these, and most other popular third-party applications, enable the ‘Multiverse repositories’ by going to ‘System > Software Sources’ then checking the boxes below.
Installing ubuntu-restricted-extras is a snap from thereon in, either find it in add/remove, synaptic or by issuing ‘sudo apt-get install ubuntu-restricted-extras’ in a terminal.
Automatic Log-In
As sexy as Janty’s new log in screen is, having to login just slows me down!
To set Ubuntu to auto-log you in: –
1. Go to SYSTEM > ADMINISTRATION > LOGIN WINDOW
2. For security reasons you’ll have to now enter your administrative password. Do so.
3. Go to the SECURITY tab and check “ENABLE AUTOMATIC LOGIN”, select the user name/profile that you want to auto-login with and then close the window to save the changes!
Change the default theme
I don’t particularly like the default Ubuntu theme ‘Human’ (does anyone?!). My favourite theme is now included in Ubuntu. It’s called ‘Dust’.
To change themes go to System > Preferences > Appearance and click on the theme you like and it will apply itself.
If you’re using Dust, why not also use it’s Panel background?
- Right click panel and select Properties -> Background -> Background image
- Choose ~/.themes/Dust/panel-background.png.
For more themes be sure to check out www.gnome-look.org
Enable Compiz Fusion Desktop Effects
Open up the appearance menu (System > Preferences > Appearance) and select the ‘Visual Effects’ tab. Now choose an ‘effect’ setting.
If you want greater control over what effects you use install the Compiz Configuration Settings Manager which easily lets you specify which effects or animations you want to use.
Install it quickly by heading over to add/remove and searching for ‘compiz config’ or with ‘sudo apt-get install ccsm’ in a terminal.
There is also a simpler version available called ‘Simple-CCSM’ which you can installed the same way, either by searching for ‘Simple Compiz Config’ in Add/Remove or Synpatic, or installing it with the Terminal: ‘sudo apt-get install simple-ccsm’.
Install Firefox dust theme, add-ons and bookmarks
I use the Dust firefox theme that matches the rest of the Dust Ubuntu theme, as well as installing the Stylish Firefox add-on to get sleek rounded tabs using the round theme userstyle.
I install Adblock Plus to block all of those annoying internet adverts that eat up bandwidth, room and (increasingly) system resources.
I use xmarks to keep my bookmarks synchronised between Firefox in Ubuntu and Firefox in my OS X and Windows installations, as well as on my netbook.
I also install an add-on to make Firefox Notifications use the new Jaunty Notification System.
Install Thunderbird E-Mail Client, Emesene Crazy Instant Messenger and Gwibber
As great and capable as the default mail client ‘Evolution’ is, I prefer Mozilla’s Thunderbird E-Mail client. Thunderbird can be found in add/remove.
Pidgin comes as the default IM client and it’s great at supporting various different IM networks, but i only use MSN and i personally find the layout of Emesene is much more intuitive. You can find Emesene 1.0 in Add/Remove, however the more up-to-date version 1.5 packs loads more features that version 1.0 doesn’t – including webcam support on MSN!
![]() Gwibber is a really cool application that lets you post/read Twitter, facebook, Digg, Flickr etc updates. Read more about it here. To install it, simple go to add/remove and look for ‘Gwibber’!
Gwibber is a really cool application that lets you post/read Twitter, facebook, Digg, Flickr etc updates. Read more about it here. To install it, simple go to add/remove and look for ‘Gwibber’!
Install Adobe Air
There are thousands of free Air applications out there, and better still they run on Linux as well as Windows and OS X! You might find some you like by browsing this list.
-
You can install Adobe Air by first downloading the following file: http://airdownload.adobe.com/air/lin/download/1.5/AdobeAIRInstaller.bin
-
Once downloaded, right click the file, choose properties and grant it permission to ‘execute as a programme’ by checking the box.
-
Open a terminal window, type ‘sudo’ and then just drag the .bin file onto it and let go. Hit return and answer the prompts. Simple!
Extra! Extra! For Ubuntu x64 bit Users
-
Install Getlibs
Using Ubuntu x64 bit is painless. I used both Hardy and Intrepid 64bit versions and experienced a snappier system, faster boot time and great use of my system resources – all with out any problems whatsoever! Jaunty is set to be even more stable and continue to have a superior performance edge over 32 bit.
To install 32bit applications in x64 bit you need to install something called ‘getlibs’.
‘Getlibs’ is a collection of 32bit libraries that 32bit programmes need to run. Better yet, you can install them with one click by downloading the following .deb: –
http://www.boundlesssupremacy.com/Cappy/getlibs/getlibs-all.deb
Now you can install 32bit programmes by using: –
“sudo dpkg -i –force-all package_name.deb“ in a terminal.
-
Install Adobe Air In Ubuntu 64 bit
1. Download the following file:
http://airdownload.adobe.com/air/lin/download/1.5/AdobeAIRInstaller.bin
2. Once downloaded, right click the file, choose properties and grant it permission to ‘execute as a programme’ by checking the box.
3. Open a terminal windows and paste the following: –
sudo apt-get install lib32asound2 lib32gcc1
lib32ncurses5 lib32stdc++6 lib32z1 libc6 libc6-i386
4. Hit return, let it do it’s stuff then paste the following: –
sudo getlibs -l libnss3.so.1d
sudo getlibs -l libnssutil3.so.1d
sudo getlibs -l libsmime3.so.1d
sudo getlibs -l libssl3.so.1d
sudo getlibs -l libnspr4.so.0d
sudo getlibs -l libplc4.so.0d
sudo getlibs -l libplds4.so.0d
sudo getlibs -l libgnome-keyring.so
sudo getlibs -l libgnome-keyring.so.0
sudo getlibs -l libgnome-keyring.so.0.1.1
5. Next type sudo and then just drag the Adobe Air .bin file onto it and let go. Hit return and answer the prompts. Once that is completed paste: –
sudo cp /usr/lib/libadobecertstore.so /usr/lib32
and hit return, and then you're done!
Install Native x 64 bit Flash and Java In Ubuntu
For 64bit Flash download this script: http://home.comcast.net/~ubuntume/Get64bitFlash-0.1.tar.gz
For 64bit JAVA download this script: http://home.comcast.net/~ubuntume/Get64bitJava-0.1.2.tar.gz
- Save/Download the script you want.
- Right click on the downloaded tar.gz and select “Extract Here”.
- Close all browsers.
- Inside the folder that extracts is a “Get64bitFlash” or “Get64bitJave” file, double click on it.
- Select “Run in Terminal”
- When the terminal closes, restart your browser and your done!


